Happy Baby

A wonderful hip opener, if you do this daily through September your hips will be so much freer!

Begin lying on your back.

Bring your kneees into chest.

Raise the feet into the air so that the you are making a square shape, knees dropping into armpits, soles of the feet facing the ceiling.

Reach for the outside of your feet with your hands, draw the legs down a little deeper. Try to keep the tailbone on the floor.

If you cannot comfortably reach the outside edge of your feet try reaching for the inside or consider using a belt around the balls of the feet.

Hold for 5-10 deep breaths.

You can also raise the head on an exhale, lower on an inhale and work your core.

Revolved Dog Pose

pom

This is a challenging pose for many of us. But with practice you will soon see and feel the benefits of the stretch in the hamstrings and the freedom that this gives  enabling us to twist more deeply.


Begin on all fours in Down Dog.


Spread the fingers and push the backs of the knuckles into the earth.


Bend the right knee and reach for the right ankle or as low down as you can with your left hand. If you can start to straighten the right leg and this will revolve your body to the right. Gaze is under right armpit.


Hold for 5-10 deep breaths, repeat on the other side.


Take a Child’s Pose.


Thank you to Paula for modelling it so beautifully for us.

Ashtanga or Pose of Eight Limbs

Unknown

This is a great pose for developing a smooth transition in Sun Salutations.

Begin on all fours with straight but not locked arms.

Spread the fingers (middle finger in line with long edge of mat) and push the backs of the knuckles into the earth.

Keeping the elbows as close to the body as possible drop chest to the earth, resting chin on earth and gaze ahead.

Hold for 5-10 deep breaths.

Come into Cobra or back to Child’s Pose.

Revolved Head to Knee Variation

IMG_2237

I have only just found this delightful variation of Revolved Head to Knee Pose and wanted to share it with you.

Begin in Dandasana (sitting tall with legs out in front of you).

Bend the left knee back and reach under the left leg for your ankle (or as far as you can) with your right hand. It is best if the right elbow makes contact with the floor but if it doesn’t don’t worry.

Breath in and stretch the left arm up and as you breath out try to catch your big toe with your peace fingers (consider using a belt to assist).

As you settle into the pose allow yourself to rotate more and more to the left each time you breathe out. You should get a wonderful stretch in the left side body and also in the hamstrings of the right leg.

Hold for 5-10 deep breaths before repeating on the other side

Thank you Heather for modelling this so gracefully.

Revolved Triangle or Parivrtta Trikonasana

This month’s pose is deceptively tricky! A stretch and a rotation on a narrow axis. Often students dont like this so make the pose work for you by using a block. Make sure you are really warm before attempting this. Poses that lead into this are: Wide Leg Forward Fold, Triangle and Parsvottasana.

On an exhalation, step feet apart to form an equalateral triangle. Raise your arms shoulder height parallel to the floor, palms down. Turn feet and body to the right. Align the right heel with the left heel so that feet are pointing towards the short end of the mat. As you bring the left hip around to the right pull back with the right hip and firmly ground the left heel.

With another exhalation, turn your torso further to the right and lean forward over the front leg. Reach your left hand down, either to the floor (inside or outside the foot) or, if the floor is too far away, onto a block positioned against your inner right foot. Allow the left hip to drop slightly toward the floor. You may need to press the outer right thigh actively to the left to bring you into better alignment. Gaze is to the right thumb.

If raising your right arm compromises the pose wrap the arm behind your back or hook the thumb into the right hip crease.

Hold for 5 deep breaths before coming out and repeating on the other side.

Counter with a Wide Leg Forward Fold.

Many thanks again to Cat for being a willing model. I am on the look out for a male volunteer!


Asana of the Month

IMG_2085IMG_2084This month’s pose was taught to me as a Psoas stretch and indeed if you can rotate your torso there is an element of stretch here but for me this asana stretches the quad and the outer thigh. I would recommend using padding under the knee but if it causes you pain then give this pose a miss.
Thanks to Lou and Cat for being holding the pose whilst I fiddled about with my camera!
Start on all fours, bring the left foot forward and come on to the blade edge of the left foot. See if you can drop down onto your right elbow (use a block if that helps to bring the earth up to you). Spend a few breaths here encouraging the leg knee to drop outwards. If it is available to you bend up your right leg and catch hold of the foot with your left hand. Twist left and gaze to the ceiling. Spend a few deep breaths here before repeating on the other side.
Why not send me a photo of you doing this pose!?

Baby Cradle

IMG_2056

A wonderful hip opener as shown here by the lovely Fran.

Start sitting cross-legged  with the sit bones making good connection to the earth.

Lift the right leg encouraging it to feel loose and floppy and aim to cradle it just as gently as if you were rocking a baby. If you can’t bring your arm all the way around then hold at the knee and foot. If it is more comfortable bring the left leg out straight. Try to keep the back upright and the foot flexed.

Repeat on the other side for 10 deep breaths.

This a great mobilising stretch, try doing it before class starts!

Halasana or Plough Pose

Fotolia_33912557_Subscription_Monthly_XL.jpg

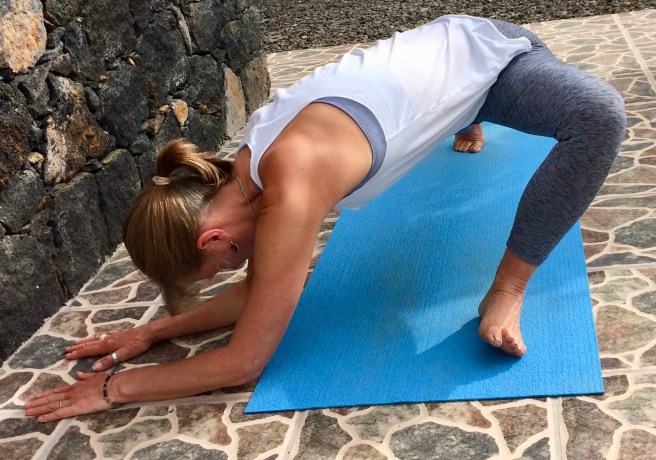
This is not a pose for newbies! However many people find it a restful pose and can happily stay in it for up to five minutes!

From Shoulderstand, exhale and bend from the hip joints to slowly lower your toes to the floor above and beyond your head. As much as possible, keep your torso perpendicular to the floor and your legs fully extended.

 With your toes on the floor, lift your top thighs and tailbone toward the ceiling and draw your inner groins deep into the pelvis. Imagine that your torso is hanging from the height of your groins. Continue to draw your chin away from your sternum and soften your throat.

You can continue to press your hands against the back torso, pushing the back up toward the ceiling as you press the backs of the upper arms down, onto your support. Or you can release your hands away from your back and stretch the arms out behind you on the floor, opposite the legs. Clasp the hands and press the arms actively down on the support as you lift the thighs toward the ceiling.

To exit the pose bring your hands onto your back again, lift back into Sarvangasana with an exhalation, then roll down onto your back, or simply roll out of the pose on an exhalation.

Contraindications and Cautions

  • Diarrhea
  • Menstruation
  • Neck injury
  • Asthma & high blood pressure: Practice Halasana with the legs supported on props.
  • Pregnancy: If you are experienced with this pose, you can continue to practice it late into pregnancy. However, don’t take up the practice of Halasana after you become pregnant.
  • With the feet on the floor, this pose is considered to be intermediate to advanced. It is not advisable to perform the pose in this way without sufficient prior experience or unless you have the supervision of an experienced instructor.

Beginner’s Tip

In this pose there is a tendency to overstretch the neck by pulling the shoulders too far away from the ears. While the tops of the shoulders should push down into the support, they should be lifted slightly toward the ears to keep the back of the neck and throat soft. Open the sternum by firming the shoulder blades against the back. It may help to have blanket under your shoulders. There should be no discomfort in the neck, if there is come out of the pose.

Benefits

  • Calms the brain
  • Stimulates the abdominal organs and the thyroid gland
  • Stretches the shoulders and spine
  • Helps relieve the symptoms of menopause
  • Reduces stress and fatigue
  • Therapeutic for backache, headache, infertility, insomnia, sinusitis
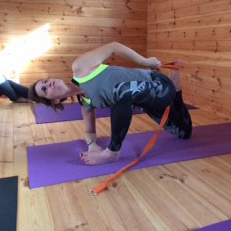
Parivrtta Janu Sirsasana

IMG_1154
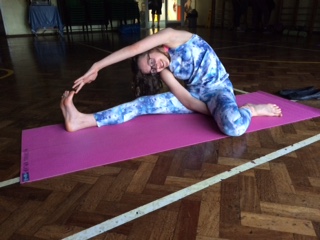
Revolved Head to Knee Pose is a deep seated twist that stretches the whole body, and strengthens your legs and core. It’s a powerful variation of the forward fold, (Janusirasana) that deepens the stretch to the hamstrings and spine, while providing all of the benefits of a spinal twist.

Your body needs to be warm to do this pose so make sure you do some Sun Salutations or other warm ups first. 

Benefits of Revolved Head-of-Knee Pose:

Parivrtta Janu Sirsasana stretches the hamstrings, spine, shoulders, lower back, and the sides of the abdomen. It provides a spinal twist that massages and stimulates your digestive organs, which helps to improve digestion. This pose also calms the mind, relieving anxiety, fatigue, and mild depression. It is also known to be therapeutic for headaches and insomnia.

Thank you to Maria for not only posing for this but smiling too!


Frilled Lizard

IMG_1261 2

This is a brilliant pose for opening the hips and stretching the IT band. One of my favourites!

Start on all fours.

Bring your left foot forward and allow both hands to twist to the right.

Turn onto the blade edge of your left foot to increase the intensity of the pose.

If you want to raise the right knee off the floor you should keep the leg and strong with the back of the knee pushing up to the ceiling. If that is too intense rein it back in and place the knee back on the floor.

Hold here for at least ten deep breaths before repeating on the other side.